I can hardly believe it's been 2 years since I've made another Jane Stickle block. Lots of my time has gone to making my Harry Potter paper-pieced quilt.
I designed every block and the quilt layout and the text, and all of the patterns have been posted for free on my
Comcast site.
UPDATE: Comcast has removed ALL personal web pages.
The patterns have been moved here for now:
https://drive.google.com/drive/folders/0By36MfVm7GtjeWw3U3lsZEdpcXc?ths=true
I completed my
Starting with Jane quilt which was a present for my sister and brother-in-law.
It underwent a few changes since the original design. I decided to make a small lap quilt instead of a wall-hanging, and this is what I ended up with.
The squares had been done as quilt-as-you-go and everything had been hand-sewn and hand quilted. But in order to finish it, I switched to machine sewing, added some plain-type squares, and turned it on point with borders.
I decided to try free-motion machine quilting on the borders in the leaf type designs, (where the stitches are EVERY size), and some quilting with the feed-dogs up where it was just curvy a bit. This is the first quilt I ever did any free-motion quilting on, but it's not too bad, if you only look from far.... I did learn never again to try to add mitered borders when adding the borders after the middle is already done and quilted. (NOT fun!)
It's a bit of a mish-mash with a hand-quilted center, and machine-quilted borders, but my sister really likes it. Having some arthritis problems makes me wonder if I might get back to Jane blocks if I started machine sewing some of them. I have the rest of the first 25 center blocks all cut out and waiting.
BUT, after finishing the long journey with the Harry Potter quilt, I felt like a bit of a break with some less finicky, larger than 5 inches square blocks. So I bought the Beach Cottages pattern.
But the one I'm making is with pastel colors to remind me of Bermuda where I spent my honeymoon, and we took our first cruise for our 35th anniversary last year. That quilt is done, and is now being pinned for machine quilting.
I've also started doing the Quiltmaker magazine anniversary quilt called "Quiltmaker's Garden". It's a 5 part series, and I'm still on Part 1, but I do have all my fabric bought. This is what the magazine quilt looks like.
I'm making a few changes and will have large birds and smaller butterflies in my quilt.
So I'm afraid it will be a while longer until I get back to the tiny Jane blocks. I have a new camera this year, so we'll probably go back to Vermont and I'll try to get some more pics of the original quilt for those who can't get to see it in person.
That's it for now.
Happy Sewing!


 TATRWJ - Row 6, Block 7
 TATRWJ - Row 9, Block 9
 TATRWJ - Row 9, Block 7


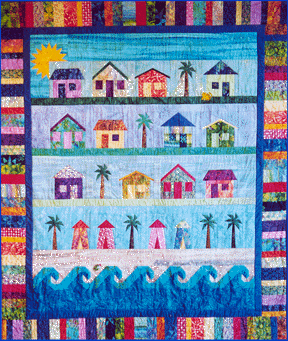

 Photo of Jane's Block
 TATRWJ - Row 6, Block 6 - Changes Marked in Green
 TATRWJ - Row 6, Block 6
 In War Time - Row 6, Block 6
 TATRWJ - Row 6, Block 5
 In War Time - Row 6, Block 5
 TATRWJ - Row 5, Block 9
 In War Time - Row 5, Block 9
 TATRWJ - Row 5, Block 7
 In War Time - Row 5, Block 7
 Re-Drafted 5" block and 4 1/2" sashed block
 Five blocks, quilted and joined
 Five blocks, view of back and quilting
 Blocks Sewn Into Rows - Rows Not Joined Yet

